Streamlit: Navigating Multi-page Apps with v1.30.0
Streamlit 1.30.0 gives us a way of navigating multi-page apps programmatically and the streamlit-option-menu lets us build custom menus
A few months ago I wrote an article about how to develop multi-page apps in Streamlit; I came up with three solutions that I thought were pretty good but, oh my goodness, within hours, Streamlit had announced native support for multi-page apps!
What to do? My three methods had now to become four by including the new solution, alongside my original ones. I still thought that my best solution was still superior to the Streamlit one, though (well I suppose I would, wouldn’t I?).
But to be honest, the new Streamlit method had a big advantage: it was simple. With the new method, you just need to create a sub-folder called pages and locate your additional pages there. Streamlit would automatically pick them up and create a clickable menu of pages in the sidebar.
Simple, effective but pretty basic: you cannot style the menu in any way, the page titles are taken from the file names (underscores are replaced with spaces) and the order is alphabetical.
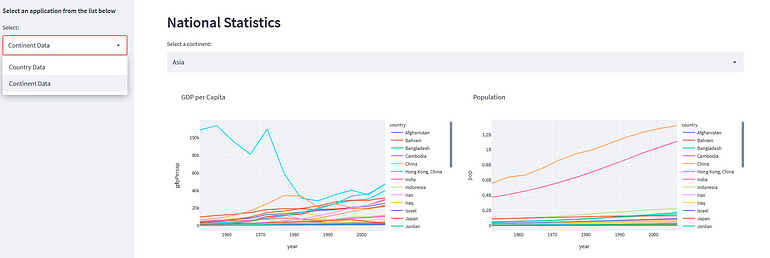
By way of contrast, here is one of the ones that I created — still in the sidebar but using a select box.
But that has all changed in Streamlit version 1.30.0.
Streamlit 1.30.0
Streamlit has introduced a new method, st.switch_page(), which lets you change the page being viewed programmatically.
In their documentation, Streamlit suggests that buttons could be used to select a page. In the code below you can see the idea.
import streamlit as st

st.header("Multipage navigation")

if st.button("Home page"):
    st.switch_page("multipage-nav1.py")
if st.button("Page 1"):
    st.switch_page("pages/page1.py")
if st.button("Page 2"):
    st.switch_page("pages/page2.py")
And the resulting app will look something like the screenshot below
As you would expect, clicking on one of those buttons will invoke the appropriate page. You cannot, by the way, specify an arbitrary Python file, the pages still have to reside in the pages sub-folder or be the main page that was run in the first instance.
Putting this vertical menu of buttons might be a bit nicer if it was in the sidebar but what about making a horizontal navigation bar at the top of the page? We can organise the buttons in three columns like in the code below.
import streamlit as st

st.header("Multipage navigation")

col1, col2, col3 = st.columns(3)

if col1.button("Home page"):
    st.switch_page("multipage-nav3.py")
if col2.button("Page 1"):
    st.switch_page("pages/page1.py")
if col3.button("Page 2"):
    st.switch_page("pages/page2.py")
The result is a little more like a traditional menu bar.
We can do better than that, though
But before we do, I’m afraid I have to confess that the images above are with the sidebar closed. The sidebar navigation still exists in addition to the new buttons. Unless you manually close it, the app will look like the image below.
But that is easily fixed.
In addition to the ability to programmatically change pages, Streamlit has added a way of removing the automatic sidebar navigation. Create a .streamlit folder and in that folder edit a file config.toml to contain the following:
[client]
showSidebarNavigation = false
This will remove the page navigation menu and because it is in the config.toml file, it will affect all apps that are in the same directory. It is a shame that this cannot be done programmatically as this would allow the programmer more control over the individual apps.
By the way, you can still use the sidebar for other purposes, it’s just the navigation that is removed.
New navigation
So, my aim, here, is to create a new navigation menu that is closer to the ones I had in my earlier article but using the new 1.30.0 method.
The st.switch_page() method lets us move from one page to another but of course, we need the user to select the page to move to.
One option is to use a Streamlit select box which will give us a dropdown menu of page options. Another would be to use radio buttons to select the page. My favourite, though, is not a standard Streamlit widget but the downloadable component streamlit-option-menu.
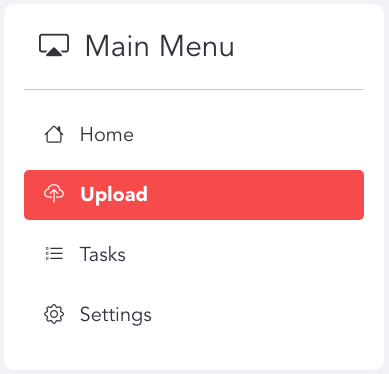
Here’s a screenshot from the GitHub repository that shows you the sort of menu it produces.

You can configure various aspects of the menu, the icons, for example, and also choose to make it vertical or horizontal. (Find the source and documentation here: streamlit-option-menu)
I’ve created a demonstrator that uses a select box, radio buttons and the option menu to create a custom navigation for a multi-page app. And you’ll be able to see the code for that and other options in my GitHub repository.
The menus in that app look like the screenshot below.
However, the code that I’m going to share with you here uses the option menu. The first two widgets are built-in, of course, but to use the option menu we will need to install it and import it into our Streamlit program.
Installation is, as you might expect, from PyPi:
pip install streamlit-option-menuImporting it is equally straightforward:
from streamlit_option_menu import option_menuThe app
We will develop a simple app of three pages. The first will be an introductory page and the other two will display graphs of GDP and population data about a country or continent.
The graphs show how population and GDP are related and the data are provided in the Plotly library. The data originate from Gapminder, an organisation founded by the late Hans Rosling and whose mission is to “…fight devastating ignorance with a fact-based worldview everyone can understand” — it’s worth a visit just to see how much you think you know but actually don’t. Gapminder’s data is free to use under the Creative Commons Attribution 4.0 International Public License.
The actual content of the pages does not really concern us greatly but briefly, each page imports data and draws two Plotly charts from that data each in a separate column. (They are essentially the same pages that I used in my original multi-page article.) The three pages are called ‘Home’, ‘Continent Data’ and ‘Country Data’.
Unlike the default navigation — which is automatic — to use the new st.switch_page() method, the navigation must appear on each page. To make life easier, and to be consistent, we will define the navigation code in a single function that can be imported into each page.
The code is shown below.
import streamlit as st
from streamlit_option_menu import option_menu

# Define the pages and their file paths
pages = {'Home':'multipage-nav3.py',
         'Continent Data':'pages/continentData.py',
         'Country Data':'pages/countryData.py'}

# Create a list of the page names
page_list = list(pages.keys())

def nav(current_page=page_list[0]):
    with st.sidebar:
        p = option_menu("Page Menu", page_list,
            default_index=page_list.index(current_page),
            orientation="vertical")

        if current_page != p:
            st.switch_page(pages[p])
The first thing is to import the libraries. Next, we define the pages in a Python dict that has the page names as keys to the path to the actual page. We then create a list of the pages by extracting the keys from the dict.
To implement the correct navigation we need to know which page we are on: we only want to change the page on request, not reload the current one. So, the function nav, which implements the navigation, takes a parameter that represents the current page (it defaults to the first in the dict, the home page) and only if a different page is selected do we make a change.
The variable p is set to the selection from the option menu (whose default is the current page) and only if this is different to the current page is the st.switch_page function called.
So we can use this on all pages we put it in a separate file in the root folder which I’ve called navbar.py. We can import this into each page, call the nav function and this will display the menu in the sidebar.
The code below is for the main page of the demonstrator app. It just displays some text and displays the menu. The code here is trivial — the important bit is the call navbar.nav('Home')
which invokes the nav function from navbar.py with the name of the page (‘Home’ in this case).
import streamlit as st
import navbar

st.set_page_config(layout="wide")
st.header("Multipage navigation")

# Display the menu
navbar.nav('Home')

st.markdown("""
            This app is a demonstrator of programmatically selecting a page in a multipage app.

            The pages display GDP data for countries or continents. The data is bundled with Plotly
            and originates from the Gapminder Foundation.
            """)
When we add the other two pages that also call the menu function we end up with an app that looks a bit like this.
Here is the code for the page shown above.
import streamlit as st

import pandas as pd
import plotly.express as px
import navbar

current_page = "Country Data"
st.header(current_page)

navbar.nav3(current_page)

df = pd.DataFrame(px.data.gapminder())

# Countries
clist = df['country'].unique()

country = st.selectbox("Select a country:", clist)

col1, col2 = st.columns(2)

fig = px.line(df[df['country'] == country],
                x="year", y="gdpPercap", title="GDP per Capita")
col1.plotly_chart(fig, use_container_width=True)

fig = px.line(df[df['country'] == country],
                x="year", y="pop", title="Population Growth")
col2.plotly_chart(fig, use_container_width=True)
Most of it is involved in drawing the chart but the important part, for our purposes here, is this bit:
import navbar

current_page = "Country Data"
st.header(current_page)

navbar.nav3(current_page
As you can see we import the library file, set the name of the current page (display the name) and use that name as a parameter to the nav function.
Alternatives
If we were to configure the option menu to be horizontal instead of vertical and put it in the main menu rather than the sidebar we would see something like the image below with a fairly traditional-looking horizontal menu. This, of course, is displayed in the main window, not the sidebar.
As I mentioned earlier, we could use the select box, or radio buttons as a menu and the demonstrator app uses each of the three navigation styles — one on each page. You can find it here: demonstrator.
The code for the different versions of this app can be seen in the GitHub repository — go directly to it here, or you can view it from the demonstrator web page.
It’s (more) complicated
For sure there is more work involved in implementing a navigation system using the new features in v1.30.0 but the result is better-looking and probably worth the effort if you are writing an app for use by a customer or you want to keep the sidebar free for other purposes.
On the other hand, if the app is for your own use or you are developing a prototype, the simple and original approach is easier.
I hope that this has been useful and thanks for reading. You can see links to more of my work here on Medium or my website.
All images/screenshots were created by me, the author, unless otherwise indicated.


